Index
| #1 Introduction to Ecommerce Tracking | #12 Product SKU |
| #2 Introduction to Shopping Carts | #13 Average Price |
| #3 Introduction to Payment Gateways | #14 Product Revenue |
| #4 How Ecommerce Tracking works in Google Analytics | #15 Per Session Value |
| #5 E-commerce Conversion Rate | #16 Where you can see e-commerce metrics in Google Analytics? |
| #6 Ecommerce Transactions & Transaction IDs | #17 Ecommerce Data |
| #7 Revenue | #18 Anatomy of E-Commerce Tracking Code |
| #8 Average Order Value | #19 Example of an e-commerce tracking code in Google Analytics |
| #9 Unique Purchases | #20 Setting up ecommerce tracking in Google Analytics |
| #10 Quantity | #21 Important points about Ecommerce Tracking in Google Analytics |
| #11 Average Quantity |
Introduction to Ecommerce Tracking
If you run/manage an online store/app, you can’t just depend upon the analytics reports provided by your shopping cart. You need Google Analytics Ecommerce tracking set up for your website. It is only by using Google Analytics ecommerce tracking, you can correlate sales data with website usage data like sessions, bounce rate, traffic source/medium, landing pages etc.
Such type of correlation analysis is required in order to understand the performance of your website landing pages and marketing campaigns. Otherwise you may never know, which landing pages and/or campaigns are driving sales and which are not. Before you can set up ecommerce tracking, you need to install Google Analytics on your website.
Google Analytics (GA) is a free online tool which is used by millions of websites all over the world. Installing GA is pretty easy. You just need to add a small tracking code in the head section of all the pages on your website. Almost all major shopping cart vendors provide integration with Google Analytics. So if you are not sure, just ask your shopping cart support, about GA installation.
However shopping cart vendors generally won’t help you in setting up ecommerce tracking for your website via GA. You need to hire a developer (who has experience with Google Analytics Development environment) to install ecommerce tracking for you.
Understanding Shopping Carts & Payment gateways
In order to understand, how ecommerce tracking works, you first need to know about shopping carts and payment gateways. You can learn about, how shopping carts and payment gateways work and interact with Google Analytics, in this article: Understanding Shopping Carts for analytics and Conversion Optimization
E-commerce Conversion Rate

E-commerce conversion rate is the percentage of sessions which results in e-commerce transactions (in a given time period).
E-commerce conversion rate = (Total E-Commerce Transactions/Total website sessions) * 100
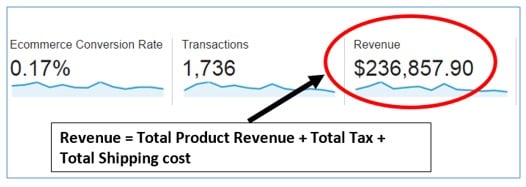
For e.g. the e-commerce conversion rate in the chart above was calculated as:
= (1,736 transactions / 996,563 sessions) * 100 = 0.17%
Ecommerce Transactions & Transaction IDs
Transaction (or e-commerce transaction) is a purchase order.

For example 1,736 transactions means 1,736 purchase orders were placed on the website.
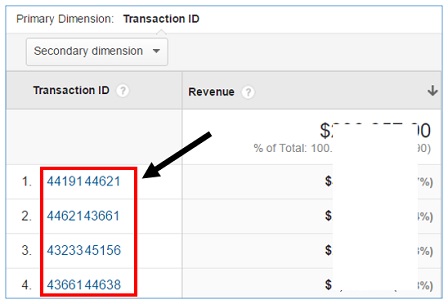
The e-commerce overview report shows the total number of transactions carried out on the website in a specified time period. Each transaction is identified through a unique ID known as transaction ID.

Here, 4419144621 is a transaction ID.
A single transaction can include several products or several units of same product as a person can buy several products in one transaction or several units of a same product in one transaction. For example, a person can buy Iphone and a Ipad in a single transaction or a person can buy 10 units (or pieces) of Iphone in a single transaction.
Note: The value of Transaction ID is of type ‘string’.
Revenue

The revenue that you see in the ‘e-commerce overview report’ is the total revenue.
Total Revenue = Total Product Revenue + Total Tax + Total Shipping
For example, the total revenue in the ‘e-commerce overview report’ was calculated as:
Total Revenue = $188,211.37 (total product revenue) + $47,371.58 (total tax) + $1,274.95 (total shipping) = $236,857.90
Your total revenue figure in Ecommerce overview report depends upon how the ecommerce tracking has been setup.
If your client decided to exclude tax and shipping amount from the total revenue, then your total revenue and product revenue amount would be the same. If the tax information and/or shipping information is not supplied while setting up e-commerce tracking then Google Analytics can’t report such information in its reports and they won’t be included in the computation of total revenue.
Note: The value of Revenue is of type ‘currency’.
Average Order Value

Average value or average order value (AOV) is the average value of an e-commerce transaction.
Average Value = Total Revenue/Total Transactions
For example, the AOV in the chart above was calculated as:
AOV = $236,857.90 / 1,736 = $136.44
Note: The value of Average Order Value is of type ‘currency’.
Unique Purchases

Unique purchase is the total number of times a product or a set of products was a part of a transaction.
There are two categories of unique purchases in Google Analytics:
#1 Total Unique purchases of a set of products
#2 Total Unique purchases of a product.


Note: The total unique purchases of a product is not equal to total number of units sold for the product in one transaction.
For example, the total unique purchases of the first product is 75. But many people wrongly assume the 75 units of the first product were sold in one transaction. But this is not the case. The 75 figure tells you that the first product was a part of a transaction 75 times. It doesn’t tell you the number of units sold for the product in one transaction.
In order to find the number of units of a product which were sold in one transaction, follow the steps below:
- Click on a product link in the ‘Product Performance’ report (under Conversions > Ecommerce).
- Add ‘transaction ID’ as a ‘secondary dimension.
- Sort the ‘Unique Purchases’ column in decreasing order.
You will now see a report like the one below:

Note: The value of Unique Purchases is of type ‘number’.
Quantity

Quantity is the total number of units sold for a product or set of products. There are two categories of quantities in Google Analytics:
#1 Total number of units sold for a set of products
#2 Total number of units sold for a product.

Note: The value of Quantity is of type ‘number’.
Average Quantity
Average quantity is the average number of units sold for a product or set of products in one transaction.

Average Quantity = Quantity / Unique Purchases
For example:
- The average quantity of set of products is calculated as: 3684/3242 = 1.14
- The average quantity of 1st product is calculated as: 114/93 = 1.23
- The average quantity of 2nd product is calculated as: 62/61 = 1.02
Note: The value of Average quantity is of type ‘number’
Product SKU
Stock keeping unit or SKU is a product code which is used to uniquely identify a product.

Note: The value of Product SKU is of type ‘string’
Average Price
Average price is the price of a single unit of a product.

Average price of a set of products = Total Product Revenue / Total Quantity = $3,701,278.00 / 45,226 = $81.84
Average price of the first product = price of the single unit of a product = $79

Note: The value of average price is of type ‘currency’
Product Revenue
Product revenue is the total revenue generated from a product or a set of products.

Product Revenue = Quantity * Average Price
Here,
Total Revenue generated from a set of products is calculated as: 45,226 * $81.84 = $3,701,278.00
Total Revenue generated from the first products is calculated as: 13,281 * $79.00 = $1,049,199.00
Note(1): Product revenue doesn’t include tax and shipping charges.
Note (2): The value of average price is of type ‘currency’
Per Session Value
Per session value is the average value of a session of your e-commerce website.

Per session value = Total Revenue / Total Sessions
For example, in the chart above,
The per session value for all traffic sources is calculated as: $280,650.01 / 1,182,618 = $0.24
The per session value of the traffic from Google Organic is calculated as: $77,228.80 / 210,212 = $0.37
Higher the per session value, more valuable the traffic is for your e-commerce business.
Note(1): You can determine per session value through ‘Ecommerce’ Tabs found in various reports.
Note (2): The ‘per session value’ is of type ‘currency’
Where you can see e-commerce metrics in Google Analytics?
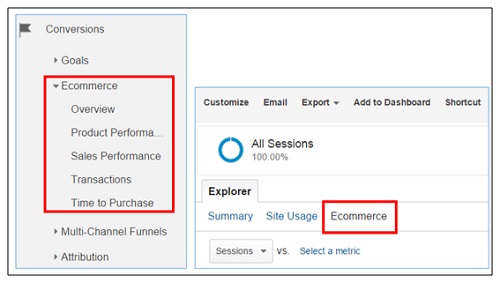
You can see ecommerce metrics in various ecommerce reports (under Conversions > Ecommerce) and via the ‘Ecommerce’ explorer tab of many other GA reports:

Ecommerce Data
The ecommerce data is made up of transaction data and item data.
Transaction Data
Transaction Data provide details about users’ transactions like:
- Transaction ID (or order ID).
- Store or affiliation name.
- Total revenue generated from the transaction (can also include shipping cost and taxes)
- Total tax associated with the transaction.
- Total shipping cost associated with the transaction
Item Data
Item data provides details about a purchased product like:
- Transaction ID (same as in the transaction data)
- Product SKU (or product code).
- Product Name
- Product Category
- Product Price
- Product Quantity
Anatomy of E-Commerce Tracking Code
The ecommerce tracking code is made up of following four commands:
- ecommerce
- ecommerce:addTransaction
- ecommerce:addItem
- ecommerce:send
‘ecommerce’ command
This command is used to load the ecommerce plugin.
Syntax: ga(‘require’, ‘ecommerce’, ‘ecommerce.js’);
The plugin contains the functionality for e-commerce tracking in GA. You have to load this plugin, otherwise your ecommerce tracking won’t work.
Note: The ‘ecommerce’ command should always be called after you have created the tracker object and before following commands are executed: ecommerce:addTransaction, ecommerce:addItem and ecommerce:send

![]()
‘ecommerce:addTransaction’ command
This command is used to create visitor’s transaction and to store all the information about the transaction.
Syntax:
ga(‘ecommerce:addTransaction’, {
‘id’: ‘1234’, // Transaction ID. Required.
‘affiliation’: ‘skinny jeans’, // store name.
‘revenue’: ‘28.8’, // total revenue.
‘shipping’: ‘10.00’, // Shipping.
‘tax’: ‘1.89’ // Tax.
});
‘ecommerce:addItem’ command
This command is used to add a product to visitor’s transaction and to store all the information about the purchased product.
Syntax:
ga(‘ecommerce:addItem’, {
‘id’: ‘1234’, // Transaction ID. Required. Same as in the transaction data.
‘name’: ‘OKEJeans’, // Product name. Required.
‘sku’: ‘SKJ49’, // Product SKU.
‘category’: ‘Men Jeans’, // Product Category or variation.
‘price’: ‘76.65’, // Product price.
‘quantity’: ‘1’ // Product Quantity.
});
‘ecommerce:send’ command
This command is used to send all of the e-commerce data to Google Analytics server.
Syntax: ga(‘ecommerce:send’);
Note: without using the command, you can’t send ecommerce data to Google Analytics.
Example of an e-commerce tracking code in Google Analytics
Here is how the ecommerce tracking code would look like, when all of the 4 ecommerce commands are used together in the right order:
ga(‘require’, ‘ecommerce’, ‘ecommerce.js’);
ga(‘ecommerce:addTransaction’, {
‘id’: ‘1234’, // Transaction ID. Required.
‘affiliation’: ‘skinny jeans’, // store name.
‘revenue’: ‘28.8’, // total revenue.
‘shipping’: ‘10.00’, // Shipping.
‘tax’: ‘1.89’ // Tax.
});
ga(‘ecommerce:addItem’, {
‘id’: ‘1234’, // Transaction ID. Required. Same as in the transaction data.
‘name’: ‘OKEJeans’, // Product name. Required.
‘sku’: ‘SKJ49’, // Product SKU.
‘category’: ‘Men Jeans’, // Product Category or variation.
‘price’: ‘76.65’, // Product price.
‘quantity’: ‘1’ // Product Quantity.
});
ga(‘ecommerce:send’);
This ecommerce tracking code is usually placed after the following line of code ga(‘create’, ‘UA-123456-12’, ‘auto’); and just before the following code ga(‘send’, ‘pageview’);.in the Google Analytics Tracking Code:
So the whole set up will look like the one below:
<script>
(function(i,s,o,g,r,a,m){i[‘GoogleAnalyticsObject’]=r;i[r]=i[r]||function(){
(i[r].q=i[r].q||[]).push(arguments)},i[r].l=1*new Date();a=s.createElement(o),
m=s.getElementsByTagName(o)[0];a.async=1;a.src=g;m.parentNode.insertBefore(a,m)
})(window,document,’script’,’//www.google-analytics.com/analytics.js’,’ga’);
ga(‘create’, ‘UA-123456-12’, ‘auto’);
ga(‘require’, ‘ecommerce’, ‘ecommerce.js’);
ga(‘ecommerce:addTransaction’, {
‘id’: ‘1234’, // Transaction ID. Required.
‘affiliation’: ‘skinny jeans’, // store name.
‘revenue’: ‘28.8’, // total revenue.
‘shipping’: ‘10.00’, // Shipping.
‘tax’: ‘1.89’ // Tax.
});
ga(‘ecommerce:addItem’, {
‘id’: ‘1234’, // Transaction ID. Required. Same as in the transaction data.
‘name’: ‘OKEJeans’, // Product name. Required.
‘sku’: ‘SKJ49’, // Product SKU.
‘category’: ‘Men Jeans’, // Product Category or variation.
‘price’: ‘76.65’, // Product price.
‘quantity’: ‘1’ // Product Quantity.
});
ga(‘ecommerce:send’);
ga(‘send’, ‘pageview’);
</script>
Here the code in bold letters is the ecommerce tracking code. The rest is the Google Analytics tracking code.
However this code is still not complete. To actually retrieve ecommerce data from your shopping cart, you need to add a server side script to the code above. Your server side script may loop through all the products purchased in a transaction and send product data for each of them.
So your actual ecommerce tracking code will look very different once the server side script is added to it.
For example, here is how your ecommerce tracking may look like, if you used PHP:
<script>
(function(i,s,o,g,r,a,m){i[‘GoogleAnalyticsObject’]=r;i[r]=i[r]||function(){
(i[r].q=i[r].q||[]).push(arguments)},i[r].l=1*new Date();a=s.createElement(o),
m=s.getElementsByTagName(o)[0];a.async=1;a.src=g;m.parentNode.insertBefore(a,m)
})(window,document,’script’,’//www.google-analytics.com/analytics.js’,’ga’);
ga(‘create’, ‘UA-123456-12’, ‘auto’);
ga(‘require’, ‘ecommerce’, ‘ecommerce.js’);
<?php
If($_SERVER[SCRIPT_NAME]==/thank-you.php”) {
?>
ga(‘ecommerce:addTransaction’, {
‘id’: ‘<? = $orders[‘order_id’]?>’,
‘affiliation’: ‘<? = $orders[‘store_name’]?>’,
‘revenue’: ‘<? = $orders[‘revenue’]?>’,
‘shipping’: ‘<? = $orders[‘shipping’]?>’,
‘tax’: ‘<? = $orders[‘tax’]?>’
});
<?php
for ($i=0;$n=sizeof($products_array);$i<$n;$i++) {
?>
ga(‘ecommerce:addItem’, {
‘id’: ‘<? = $orders[‘order_id’] ?>’,
‘name’: ‘<? =$products_array[$i][‘name’] ?>’,
‘sku’: ‘<? =$products_array[$i][‘sku’] ?>’,
‘category’: ‘<? =$products_array[$i][‘category’] ?>’,
‘price’: ‘<? =$products_array[$i][‘price’] ?>’,
‘quantity’: ‘<? =$products_array[$i][‘quantity’] ?>’
});
}
?>
ga(‘ecommerce:send’);
ga(‘send’, ‘pageview’);
</script>
Note(1): Do not use this e-commerce tracking code on your website. It is just an example and is not even a complete code.
Note(2): The actual ecommerce tracking code will vary depending upon your CMS and shopping cart.
Important points about Ecommerce Tracking in Google Analytics
#1 It is common to have data discrepancy between Google Analytics sales data and your shopping cart sales data.
All major pre-built shopping carts have the functionality to handle cancelled orders, test orders, promo/discount codes, unfulfilled orders and refund (partial or full). Google Analytics does not have any such in-built functionality.
Once a user is served an order confirmation page, the ecommerce tracking code is executed and the transaction is recorded by GA. If the user later ask for a refund, cancel the order or the order is not fulfilled then these changes don’t automatically reflect back in GA ecommerce reports. Thus depending upon the volume of cancelled orders, refunds and unfulfilled orders your website get every day, you may see either small or large data discrepancy between GA sales data and your shopping cart sales data.
Remember GA was never designed to function like an accounting software. So do not expect 100% accuracy in sales data. Since Shopping cart handles sales data much better than GA, so whenever you are in doubt, trust your shopping cart data more.
#2 Test orders can very easily skew your ecommerce data in Google Analytics
It is common for web developers to place test orders while testing an application. But it is not common for them to reverse test transactions in Google Analytics.
All the test orders need to be reversed, otherwise they can greatly inflate your sales data. Ask your developer to provide you with a list of all test orders paced on the website, at least once a month and then at least deduct them from your analysis, if you can’t reverse them.
Related Article: Fixing Duplicate, Cancelled, Test orders & Refunds in Google Analytics
#3 Data sampling issues can easily skew your ecommerce data
If your website gets more than 250k sessions a month and you don’t use GA premium, there is a good possibility that your website is suffering from data sampling issues.
When GA sample your data badly, you can’t trust the metrics reported by it. Your ecommerce data from revenue to ecommerce conversion rate could be 10 to 80% off the mark.
Avoid using advanced segments or secondary dimensions during data interpretation when you have got data sampling issues.
Related Article: Google Analytics Data Sampling – Complete Guide
#4 Watch out for Duplicate transactions
This is a very common issue I encounter while doing a GA audit. Duplicate transaction can take place when an ecommerce tracking code is executed more than once without placing any new order.
Duplicate transactions can easily skew your ecommerce data. To fix the duplicate transaction issues, check out this article: Fixing Duplicate, Cancelled, Test orders & Refunds in Google Analytics
Setting up ecommerce tracking in Google Analytics
Follow the steps below to set up ecommerce tracking:
Step-1: Sign up for Google Analytics account (if you already don’t have one).
Step-2: Add the Google Analytics tracking code on the all the pages of your website (in the head section <head>…</head>).
Step-3: Integrate your shopping cart (like Shopify) with Google Analytics. Check the help documentation provided by your cart for more details.
Step-4: Ask your developer to add the ecommerce tracking code on the order confirmation page (generally the ‘thank you’ page) and then add a server side script (like PHP, ASP etc) to it so that it can pull purchased data from shopping cart and send it to Google Analytics Server.
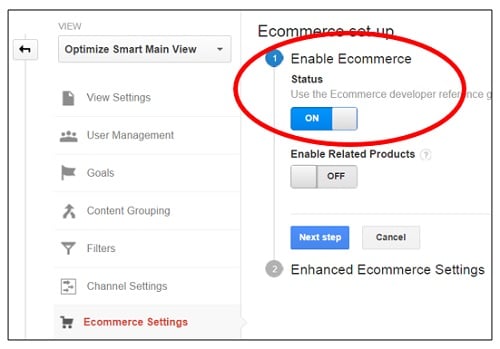
Step-5: Enable e-commerce reporting in your Google Analytics View. Go to Admin > View > Ecommerce Settings and then switch on the ‘Enable Ecommerce’ toggle button:

Step-6: Set up a funnel for your checkout process in Google Analytics. To do this, first determine all of the webpages which make up your shopping cart funnel (including the URL of the order confirmation page).
To learn more about setting up funnels in GA, check out this article: The Geek Guide to Understanding Funnels in Google Analytics
Step-7: Place a test transaction and see whether you are getting the correct ecommerce data in GA reports.
If you want to set up ecommerce tracking in Google Tag Manager then check out the following article: Implementing E-Commerce Tracking via Google Tag Manager
If you are interested in learning about enhanced ecommerce tracking, I have got half a dozen articles for you:
#1 Understanding Enhanced Ecommerce tracking in Universal Analytics
#2 Implementing Enhanced Ecommerce tracking in Universal Analytics
#3 Using Enhanced E-Commerce segments for Remarketing in Google Analytics
#4 Using Cohort Analysis & Enhanced ecommerce to understand users behavior
#5 Fixing Duplicate, Cancelled, Test orders & Refunds in Google Analytics


Very efficiently written article. It will be useful to anyone who employess it, as well as me. backlink indonesia
ReplyDelete