
#1 The first article was Understanding Enhanced Ecommerce tracking in Universal Analytics where I introduced the concept of enhanced ecommerce, enhanced ecommerce measurement model and various enhanced ecommerce commands.So if you are a first time visitor to this blog this is not the only article you can read on enhanced ecommerce tracking. All of these articles can help you greatly in understanding whatever enhanced ecommerce has to offer.
#2 The second article was Implementing Enhanced Ecommerce tracking in Universal Analytics where I provided a framework through which you can implement enhanced ecommerce tracking on any website.
#3 The third article was Using Enhanced E-Commerce segments for Remarketing in Google Analytics where I introduced ‘enhanced ecommerce segments’, the hidden gems of enhanced ecommerce reports.
#4 The fourth article was Using Cohort Analysis & Enhanced ecommerce to understand users behavior where I introduced the concept of ‘user disengagement’ and ‘Cohorts’ and showed how to do cohorts analysis via enhanced ecommerce segments.
#5 The fifth article was Fixing Duplicate, Cancelled, Test orders & Refunds in Google Analytics where I showed how you can import refund data into Universal Analytics once you have implemented enhanced ecommerce.

Shopping behavior analysis report in Enhanced Ecommerce
Enhanced ecommerce is the most difficult tracking to implement in Google Analytics.Google tag manager (GTM) just make this implementation even more difficult.
While I don’t really see any significant benefit of implementing enhanced ecommerce tracking via GTM, the implementation becomes essential once you plan to use GTM to deploy various marketing and analytics tags on your website.
This is one of those articles where I can’t give you the exact code you can use to implement enhanced ecommerce on your website.
This is one of those articles where I can’t be very specific with my instructions regarding exactly how you should add data layer codes to the various pages on your website and exactly how you should configure the various GTM tags in order for enhanced ecommerce tracking to work.
This is because the actual implementation varies from shopping cart to shopping cart and the CMS you use for your website.
What I am going to present in this article is the framework through which you can understand and implement enhanced ecommerce tracking on your website via Google Tag Manager.This is the framework I have developed after several successful implementations of enhanced ecommerce tracking via GTM.
Through this framework you can get a 10000 foot view of enhanced ecommerce tracking setup which is required to understand how to delegate this mammoth task to your developer or just to understand what this tracking setup actually entails.
First thing first. You need a developer to implement this tracking as lot of development work is involved both on the client side and on the server side.
Many developers struggle with traditional non-gtm based ecommerce tracking set up let alone enhanced ecommerce tracking setup and that too via GTM.So you need a developer who is atleast familar with Google Analytics development environment. Otherwise best of luck.
There are 5 main phases of enhanced ecommerce tracking setup via GTM:
#1 Determine your tracking requirements
#2 Identify all the data points you want to track under enhanced ecommerce.
#3 Create and add data layer code to various web pages and web elements.
#4 Create and configure your GTM tags.
#5 Test and deploy enhanced ecommerce tracking on the website.
Phase #1: Determine your tracking requirements
Enhanced ecommerce tracking is a mammoth task even for a small ecommerce website and can be very challenging and daunting experience if the ecommerce store is very big and/or is managed by a team of developers.So before you implement anything or add any piece of data layer code on a page, you need to be absolutely sure about your tracking requirements. This will help you and your developer in understanding the scope of the project.
There can be N things you can track under enhanced ecommerce. But you may have some resources or time constraints. And if your website is very big or complex, it may not be possible to implement everything enhanced ecommerce tracking has to offer, all at once.
If your developer is already neck deep in work (and most of them are) and you simply forward him the Google’s documentation on enhanced ecommerce, which provides instructions on everything enhanced ecommerce tracking has to offer, then he will be compelled to implement everything enhanced ecommerce has to offer.
With no one to guide him, he will be free to select the data points for the tracking setup which are often selected on the basis of whatever is easier to track and which may not always meet your tracking requirements.
The scope of the project in that case will then be decided solely by your developer and if you use a third party development service, you may just end up paying lot more for the development work than necessary and also may end up getting the data which don’t meet your tracking requirements or align with your business and marketing goals.
That is why it is important that you identify your tracking requirements yourself and that too before hand.
Through enhanced ecommerce tracking you can measure:
#1 views (or impressions) of internal promotion campaigns.You should measure at least all the checkout steps and purchase. Tracking anything else is optional. Sometimes because of shopping cart and CMS constraints, it may not be technically possible to track certain type of data. So remember that too.
#2 clicks on internal promotion campaigns.
#3 views of a product in a product list
#4 clicks on a product’s link in a product list
#5 views of product detail pages.
#6 clicks on ‘Add to Cart’ buttons.
#7 clicks on ‘Remove from cart’ button
#8 clicks on ‘checkout’ button
#9 checkout steps.
#10 checkout options like:
#1 Clicks on ‘Update Cart’ button#11 purchase
#2 Clicks on ‘Apply Coupon’ button
#3 Clicks on ‘Calculate Shipping’ button
#4 Clicks on ‘Continue Shopping’ button
#5 And any other checkout option available.
#12 refunds
However more enhanced ecommerce data you can collect, the better insight you will get.
In order to truly benefit from enhanced ecommerce tracking, you should always aim to collect as much ecommerce data as possible.
Phase #2: Identify data points for enhanced ecommerce tracking
Before you can add any data layer code, you need to manually identify all the web pages/templates and all the web page elements (like ‘add to cart’ button, ‘remove from cart’ button, ‘product thumbnails’, ‘product links’ etc) which will be part of the enhanced ecommerce tracking setup and to which you will add the data layer code meant for enhanced ecommerce.Phase #3: Create and add various data layers

Example of enhanced ecommerce data layer. Source: https://developers.google.com/tag-manager/enhanced-ecommerce
The major part of enhanced ecommerce tracking setup is to create several data layers and then hardcode them one by one to various web pages and page elements of an ecommerce website.The data layer code is added to various web page elements (like ‘add to cart’ button) via event tracking. So event tracking is also an important part of enhanced ecommerce tracking setup.
Depending upon the size of your website and level of customization your CMS offer (through templates), you may end up creating dozen or more data layers.
Google’s official documentation on setting up enhanced ecommerce tracking via GTM does a good job of explaining what data layer code you need to place on various web pages and web elements of your website.
So there is no point mentioning these data layers again in this article. However do remember that you can’t just copy paste these data layers on your website and expect the enhanced ecommerce tracking to work.
The data layers mentioned by Google in its documentation are just examples of how you should push enhanced ecommerce data into data layers.You need to ask your developer to write a server side script through which you can retrieve ecommerce data from your shopping cart software and populate the various fields of the enhanced ecommerce data layer with the actual data.
Your script should loop through all the products purchased in a transaction and send product data for each of them.
Make sure that the data layer snippet is always placed above the GTM container code.If you place the data layer snippet below the container snippet than the data layer variables may not be available to the container. In other words, the container won’t be able to pull data from the data layer and your enhanced ecommerce tracking may not work correctly.
Once the enhanced ecommerce tracking setup is complete, you then need to make sure that these data layers don’t break on each website update. Because once a data layer breaks, a part of your enhanced ecommerce tracking setup will stop working.
Phase #4: Create and configure your GTM tags

Enhanced Ecommerce Tag configuration in GTM. Source: https://developers.google.com/tag-manager/enhanced-ecommerce
Again Google’s official documentation on setting up enhanced ecommerce tracking via GTM does a good job of explaining how to configure various GTM tags for enhanced ecommerce.
However bear in mind that
the various tag configurations mentioned by Google in its documentation are just for guidance.The actual tag configuration depends upon the shopping cart and CMS you are using and also upon how you have set up each data layer.
Make sure that you do not publish the GTM container at this point. Even if you already have GTM installed on your website then also do not publish any GTM configuration related to enhanced ecommerce tracking at this point.
This is because you can not run enhanced ecommerce tracking in parallel with traditional ecommerce tracking. So you need to thoroughly test your enhanced ecommerce tracking setup before you remove traditional ecommerce tracking from your website.
You don’t want to be in a situation where you keep loosing precious ecommerce data in the background while you are busy setting up enhanced ecommerce tracking.
Here I am assuming that you are already using Google Analytics or Universal Analytics on your website with ecommerce tracking and you want to transfer all of your tracking to GTM and at the same time upgrade to enhanced ecommerce.
Phase #5: Test and deploy enhanced ecommerce tracking on the website
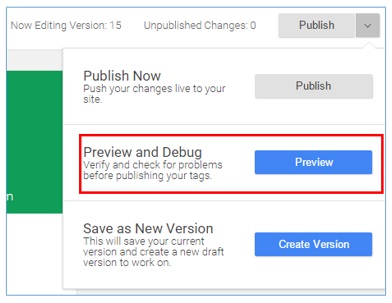
Preview and debug feature in Google Tag Manager.
Create and use Google Analytics test property for this purpose so that you don’t corrupt your existing ecommerce data with test data.
Once you are sure that everything is working as intended then remove all the hard coded traditional ecommerce tracking code from your ‘order confirmation’ page and at the same time publish your new tag configurations.
Test the new ecommerce setup one more time but this time on the live website and make sure that everything is working as intended.
The best time to deploy enhanced ecommerce tracking is during weekends (when sales is relatively low) or during the time when people buy the least from your website.In this you can minimize the sales lost due to tracking code bugs. If you manage a very big store then it is wise to thoroughly test your enhanced ecommerce tracking setup for a week or two on staging website before pushing changes to the live website.


No comments:
Post a Comment